HW5: Depth
from Focus (15 Points)
Due: Tuesday
11/21 at 11:59pm
EECS 395/495: Introduction
to Computational Photography
The
goal of this homework is to explore the focus properties of images captured by
your Tegra device. You will write a program to capture a sequence of images with
different focus settings, use these images to find the depth for each pixel in
the scene, and then use this depth map to estimate an all-in focus image.
1. Implement an android function to capture a focal stack (5 Points)
You
need to write an android function that will capture a
sequence of exposures with different focus settings. You will implement the focal sweep using a loop and the LENS_FOCUS_DISTANCE
to set the focus before capturing each image. Here are some
guidelines:
1.
Since the Tegra camera has a relatively small aperture size, you will
need to choose a relatively small scene for this experiment. As a guideline,
you should choose objects that are about 3cm in size and your scene depth
should be from around 5cm to around 30cm. Figure 1 shows an example scene.
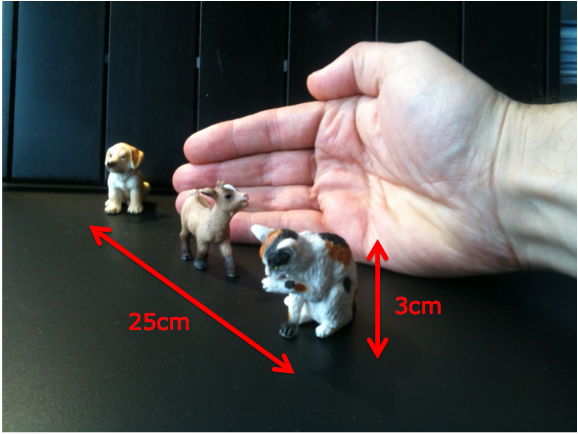
Figure 1: An example scene to capture
depth from focus
2.
Make sure that your scene has plenty of texture. This will be important
for depth estimation since our focus measure will only work well for textured
regions of the image.
3.
Capture images in JPEG format. You can use a relatively low resolution
(e.g. 640x480) so that it doesn't take too long to capture the image sequence.
4.
Capture a sequence of about 25-50 images where the focus is adjusted
between each exposure. You can use the LENS_FOCUS_DISTANCE setting to set focus. You should set the range of focal distances so that each pixel in your
scene is in focus in at least one image of your focal stack. Fig. 2 shows two
example images from the focal stack for the scene from Fig. 1.
5.
Keep track of the focal distance used for each exposure. You will use
this to calibrate the focal stack in part 2.
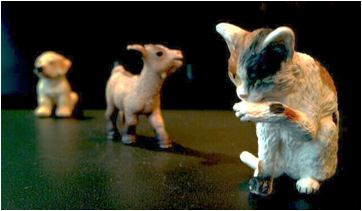
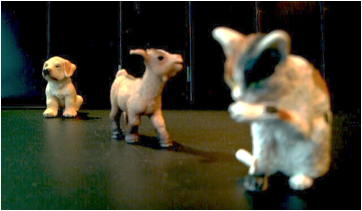
Figure 2: Two
images from a focal stack sequence of the scene from Figure 1. In the left
image the foremost object is in focus (the cat). In the right image, the most
distant object is in focus.
2. Calibrate your focal
stack (2 Points)
You
may notice that there is a small change in magnification that occurs as you
change the focus. Once you have captured a focal stack of N images, you will need to use MATLAB to compensate for this small
change in magnification. Let the focal stack be represented by ![]() , where
, where ![]() is the index into the focal stack and
is the index into the focal stack and ![]() are pixel coordinates. Let
are pixel coordinates. Let ![]() be the set of focal distances (in meters)
used in your experiments in part 1. You can calculate the lens-to-sensor
distance during each exposure
be the set of focal distances (in meters)
used in your experiments in part 1. You can calculate the lens-to-sensor
distance during each exposure ![]() using the Gaussian Lens Law: The rear camera has an F/2.0 aperture with 2.95mm focal length, and the front camera has an F/2.8 aperture, with a claimed 4.76mm focal length
using the Gaussian Lens Law: The rear camera has an F/2.0 aperture with 2.95mm focal length, and the front camera has an F/2.8 aperture, with a claimed 4.76mm focal length
![]()
E.g. if you have 0.6 as your focus distance after you captured your image, then you will have 0.6m as your focus distance. In order to get the lens to sensor distance, you just need to plug f=2.95, v=600 into the gaussian lens law to get u.
You
will need to rescale each of the images in your stack using the equation:
![]()
where the magnification ![]() factor is different for each
image and is given by
factor is different for each
image and is given by
![]()
3. Compute a depth map from
the focal stack (3 Points)
Note: You will first need to convert your focal stack to grayscale
images before completing these steps
Once
you have calibrated your focal stack, you will use MATLAB to write a program to
compute a depth map of the scene. We will use the squared laplacian
as a focus measure. Our focus measure is:

where K is a variable that is
chosen based on the amount of texture in the scene. The depth can then be
calculated for each pixel by finding the index into the focal stack ![]() where the focus is maximum:
where the focus is maximum:
![]()
Solving
Eq. 5 will tell you which image in the stack a given pixel is in focus. You
will have to refer to your experiment in part 1 to determine what the actual
focal distance was for that image. Use Eqs. 4 and 5
to compute the depth of your scene from the focal stack you captured in part 1.
Here are a few guidelines.
1.
You can implement the Laplacian operator in
Eq. 4 as a linear filter using the following kernel:
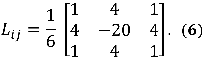
You can then implement the laplacian operator
as a convolution with the captured image:

Note: You don't have to write convolution code, you can simply use MATLAB's 'imfilter' routine to do it for you.
2.
You can try a few different values for K. Discuss the results. When is a smaller value for K best? What about a larger value?
3.
Include an image of your computed depth map in your report. Keep in
mind that the quality of your depth map will depend highly on the amount of
texture in your scene. Fig. 3 shows an example depth map computed from the
scene in Fig. 1 so you will have an idea what to expect.
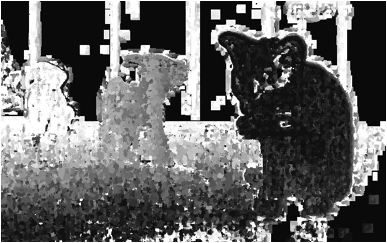
Figure 3: A
depth index map computed from the focal stack of Fig. 2. The depth map was
calculated using equations 4 and 5 with a value of K=5;
3. Recover an all-focus
image of the scene (5 Points)
Once
you have computed a depth map of the scene, you can use it to recover an
all-focus image of the scene. The all-focus image ![]() can be computed simply as
can be computed simply as
![]()
Use
Eq. 8 to compute an all-focus image and include it in your report. Fig. 3 shows
an example of an all-focus image computed from the focal stack in Fig. 2 and
the depth index map in Fig. 3.
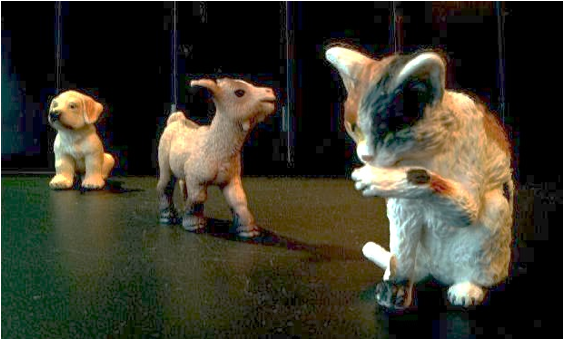
Figure 4: An
all-focus image computed from the focal stack of Figure 2 and the depth map of
Figure 3.
What to Submit:
Submit
a zip file to the dropbox, which includes
1.
A write-up document that explains what you did, what the results are, and
what problems you encountered.
2.
All code that you wrote, including the android code running on the Tegra tablet,
and the Matlab code.
3.
The write-up should include all the figures that you were instructed to
generate, and should answer all the questions posed in this document.